Live Server는 HTML 등의 수정사항들을 즉각 반영되어 많이 사용되는 확장입니다.
이번 포스팅에서는 이 Live Server와 디버그 확장으로 일반적으로 사용되는 Debugger for Chrome 확장의 연동 설정법에 대해서 다룹니다.
1. Liver Server 설정
1) 설정 창 열기
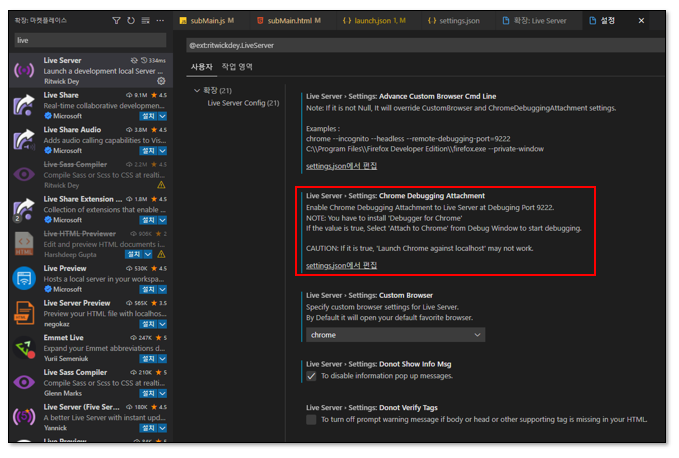
"마켓플레이스" > "Live Server" 검색 > "톱니버튼" 클릭 > "확장 설정" 클릭
2) Chrome Debugger 사용여부 설정
- 아래 설정 내용 확인 후 settings.json 편집
(경고문구 : Debugger를 Launch 형태로 실행할 경우 동작하지 않음)
- settings.json에서 "liveServer.settings.ChromeDebuggingAttachment" : true 설정
 |
| [설정창] |
 |
| [setting.json] |
3) Chrome 브라우저 디버깅 포트(9222) 지정
- settings.json에서 "liveServer.settings.AdvanceCustomBrowserCmdLine" 에 값 설정
- 값 : "C:\\Program Files (x86)\\Google\\Chrome\\Application\\chrome.exe --remote-debugging-port=9222"
( 형광팬 강조한 부분의 chrome.exe 경로만 개인에 맞게 지정)
- Live Server가 실행될 때 출력되는 브라우저를 커맨드에 의해 실행하는 설정
- 디버깅포트 (9222)로 Chrome이 실행되야함
4) Web Service 실행포트 지정
- 개인의 Service 실행 포트로 설정
- settings.json에서 "liveServer.settings.port" : "8080"
여기까지 Live Server 설정을 마치면, Live Server 동작여부 확인 후 아래와 같이 Chorme Debugger 설정을 진행합니다.
[필자의 settings.json 내용]
1 2 3 4 5 6 7 8 9 10 11 12 13 14 15 16 17 18 19 20 21 22 23 24 25 26 27 28 29 30 31 32 33 34 35 36 37 | { "workbench.iconTheme": "material-icon-theme", "editor.minimap.enabled": false, "git.ignoreMissingGitWarning": true, "bracketPairColorizer.depreciation-notice": false, "files.exclude": { "**/.classpath": true, "**/.project": true, "**/.settings": true, "**/.factorypath": true }, "editor.suggestSelection": "first", "vsintellicode.modify.editor.suggestSelection": "automaticallyOverrodeDefaultValue", "[javascript]": { "editor.defaultFormatter": "esbenp.prettier-vscode" }, "editor.renderWhitespace": "all", "[json]": { "editor.defaultFormatter": "vscode.json-language-features" }, "bookmarks.navigateThroughAllFiles": false, "workbench.editor.enablePreview": false, "files.trimFinalNewlines": true, "prettier.tabWidth": 4, "liveServer.settings.host": "localhost", "liveServer.settings.CustomBrowser": "chrome", "liveServer.settings.ChromeDebuggingAttachment": true, "liveServer.settings.AdvanceCustomBrowserCmdLine": "C:\\Program Files (x86)\\Google\\Chrome\\Application\\chrome.exe --remote-debugging-port=9222", "liveServer.settings.port": 8640, "liveServer.settings.NoBrowser": false, "liveServer.settings.donotShowInfoMsg": true, "editor.copyWithSyntaxHighlighting": false, "workbench.editor.wrapTabs": true, "settingsSync.ignoredExtensions": [ "ritwickdey.liveserver" ] } |
2. Debugger For Chrome 설정
1) 설정 창 열기
- 기존에 디버깅 설정을 했었다면, 프로젝트 하위 경로에 ".vscode" 폴더 안에 있는 "launch.json" 선택
2) launch.json 설정
- 아래 내용과 같이 "request" : "attach" 로 설정
- "port" : 9222 설정
- Live Server 로 실행된 브라우저(9222)에 attach로 접근하여 실행하기 위함.
[필자의 launch.json 내용]
1 2 3 4 5 6 7 8 9 10 11 12 13 14 15 16 17 18 | { "version": "0.2.0", "configurations": [ { "name": "[Attach] Chrome", "type": "pwa-chrome", "request": "attach", "port": 9222, "urlFilter": "http://localhost:8640/*" }, { "type": "chrome", "request": "launch", "name": "Launch Chrome against localhost", "url" : "http://localhost:8640/index.html" } ] } |
3. 최종 동작 확인
1) Live Server로 실행 (하단 "Go Live" 클릭 혹은 Alt + L , Alt + O)
2) HTML 수정하여 Live Server 동작확인
3) Chrome Debugger 실행 (F5)
4) Debugger 동작확인
5) "Debugger for Chrome" 실행오류 (Attach Error)
Cannot connect to the target at local:9222: Could not connect to debug target at http://localhostL9222: Could not find any debuggable target
디버깅포트 9222로 설정함에도 불구하고, 디버거 실행 시 아래와 같은 팝업이 출력된다면 모든 Chrome 창을 닫고 재실행해 보시기 바랍니다.


![[JavaScript] Object 객체의 Key, Value 추출하기 - (Filter를 이용한 특정 Key 추출)](https://blogger.googleusercontent.com/img/b/R29vZ2xl/AVvXsEhnzOONWxLMg58eV_IzhqHtXIjekIJVvxxjimop_O5sslC8vOWdctQtSFauRvbA8NUmDsby2Q_MW1fYb0dOyKSSeVz07ANnsCFmYshyphenhyphenuaVYdv-YU6TCeGLII6o836ksqOESfVNx1higbz55/w100/thumb_js.png)
![[ORACLE / PROCEDURE] 오라클 프로시저 생성 및 호출 방법](https://blogger.googleusercontent.com/img/b/R29vZ2xl/AVvXsEjLjnYenwhpAKdnO6CwXmUym2Hkm59N-2f-VyFYOEry_xcTWkQ_DT0VEfIulinQJe3MdWrX-Jao9SsXrfxNaB2yJHllgXllmrJF3bqv7SsxYsyN_3Rzo3AltuIEomjBxNRfAlU08RsaVG_j/w100/sumn_ora.png)
![[ORACLE / PROCEDURE] 동적쿼리, 문자열 쿼리 실행, EXECUTE IMMEDIATE](https://blogger.googleusercontent.com/img/b/R29vZ2xl/AVvXsEh-jOU4BzIQQhKHqrudnurKUbK7kHSFJM_Qyvzyok-rNnl8UUnzB-9ce-24G2eEVLlFAhFcmQsTQNG5rp64yYYV-Q8LHfauADxczVC1Lcpo9l5Q6DgrQirv2o-34gMPbqHJ4znU2PXkIoUc/w100/sumn_ora.png)
0 댓글